Part 1 – Setting up a New Aquarium
Part 1 – Setting up a New Aquarium
Select the area of the house where you want the tank to be.Buy the largest aquarium that will fit in your space, or the largest aquarium your budget will allow. Larger aquariums provide a much more stable environment, because the water chemistry will be easier to maintain over time. A good rule of thumb is that a reef aquarium will end up costing twice what you think it will.
- Choose between acrylic or glass, knowing that acrylic will scratch easily but is easier to drill and is much lighter. Make sure to get a tank that is pre-drilled with an internal “overflow”, sometimes described as “reef-ready” tank. It is better to choose a tank that is not too deep(e.g. 24 to 30″) so you can reach the bottom easily; a tank that is wider will provide a better depth of view for a more natural look. A second smaller tank (a sump) is placed under the main aquarium and will hold all the equipment out of sight.
- Choose lighting: Metal halide lamps provide the best lighting for most of the corals commonly kept, other forms of lighting are also obtainable and offer varying degrees of success. 250 watts bulbs will suit most common aquariums except for the deeper ones where 400 w bulbs provide more light penetration.The color spectrum of the bulbs (expressed in color temperature in Kelvins) is a matter of personal preference. Bulbs between 6500 kelvin and 20000 kelvin are the most popular, and the higher the kelvin rating the ‘bluer’ the color. Some claim coral growth is affected by the color, but corals grow fast and successfully on either end of bulb ’spectrum’. One halide bulb for every 2-3 feet of tank length is usually recommended.
- Other types of lights to consider are florescent lighting, specifically high intensity fluorescents. Two popular kinds are Power Compact and T5. These can be found in many of the same color ratings as metal halide bulbs, and are much cheaper. A popular choice is to use both florescent and metal halide. An aquarist will use a single color of metal halide, like 10000k, and will use a few blue (or Actinic) fluorescents to make the color more pleasing.
- Set up the filtration: Get a good quality protein skimmer and place it in your sump. Do not skimp on this. Often protein skimmers are under-rated for the size of tank, so in practice a skimmer rated for a 100 gallon tank is barely adequate for a 50 gallon reef tank (especially one with many fish that get fed a lot). Needle wheel skimmers are a popular choice, and can be very effective for their size/cost. Don’t rely on ‘venturi’ skimmers, unless they are high end models with very strong pumps.
Don’t bother buying ‘canister’ filters, often used on freshwater aquariums. Not only are they fairly useless in a marine aquarium environment, they can even cause a buildup of Nitrates on their internal media that can negatively effect the aquarium. Bottom line is they are a waste of money.
Adjust the flow. Now is time to get a saltwater rated pump to return the water from your sump to the main tank. Additional powerhead pumps in the tank or external pump(s) should be installed to provide additional vigorous turbulent flow, which is crucial to the survival of your future corals.
Place a heater(s) in your sump.
Consider using an aquarium chiller. The high intensity lighting used in reef aquariums adds a surprising amount of heat to the aquarium, making it harder to keep a reef aquarium ‘cool’ enough. Even in San Francisco, where the avg. temp is around 68 degrees, its easy to overheat an aquarium on a warm day. If you have hot summers where the temp in your home goes above 80 degrees F, you will overheat your aquarium.
Fill the tank with tap water partially then totally to test for leaks. Run all your pumps.
Prepare enough artificial seawater for the volume needed. Use only a good aquarium sea salt brand and purified water with a Reverse Osmosis or R0/DeIonization Filter. Another option is to fill the tank with RO/DI water and then add the salt. The importance of RO/DI system cannot be understated. Tap water is simply not suitable for reef aquariums. A good RO/DI system is not too expensive, and should be considered a necessity. A 100 gallon per day model is a good choice, because you won’t have to wait too long to make purified water which is a nice convenience.
Once you mix your saltwater and fill your aquarium, turn on all your pumps and let the water ‘rest’ for a day. It takes a little time for your salt to dissolve and your water chemistry to stabilize, and the action of the pumps will drive out excess carbon dioxide (which initially causes a low pH).
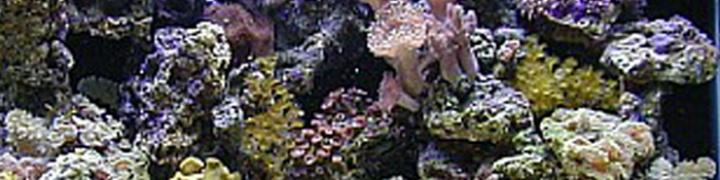
Add ‘live rock’ and arrange to your liking, approximately 20% of your volume. The rock can be placed on an aragonite sand bed but the substrate will tend to accumulate detritus overtime. A sanded depth of 4 to 5″ is recommended for maximal detritus biological processing. Live rock can be obtained online or at your local marine aquarium store. The sand bed has to be placed before the seawater is slowly added.
Let the tank “cycle”. This means you will need to wait until the water tests negative for ammonia or nitrite. Inserting bits of frozen fish foods in the sand bed can speed the cycle. (This is un-necessary if you added live rock. There are plenty of dead crustaceans and worms already inside due to shipping). This may take 1 to 2 weeks. Algae blooms can be a natural part of the cycle. Check and make sure the salinity is stable at 1.023 to 1.026. Compensate for evaporated water losses with RO/DI water. Keep the temperature, Calcium and Alkalinity levels stable. Do not use commercial “supplements” other than water changes. Algae blooms are common for probably the first 6 months of your aquarium, so don’t be alarmed to find new algae growing.
Add cleaning creatures such as snails, small hermit crabs and finally herbivore reef fishes.
Many aquarists feel its not proper to being adding corals until the tank is a few months old. A ‘mature’ tank is much more suitable for growing coral. A good rule of thumb is to watch your live rock. At some point, you will notice the rock ‘growing’, and not just green algae. You will seen new crustaceans, worms, feather dusters, coralline algae, and more. When the algae blooms subside, and the live rock is growing nicely, its finally time to add your coral


48 comments
Comments feed for this article
May 4, 2008 at 2:21 pm
Norma
I had a fish bowl when I was growing up and had gold fish but they never seem to liver very long can you tell me why? What should I do if I want to have gold fish-the care involved so maybe now that I am older I would know how to look after them better.
norma
owner of http://www.heavenpeturns.com
May 5, 2008 at 1:25 pm
daforuiner
Clean water.
This is the number one reason gold fish die
May 12, 2009 at 11:05 pm
Elegant Perspectives
hmm… too much detritus in my tank…
November 17, 2009 at 12:17 pm
Ava
Hi, my name is Ava and I”m the blog moderator for a site called The Reef Tank, an online community for saltwater aquarists.
Had a specific question to ask the person who runs this site, but don’t know how to contact him? Can he/she please e-mail me at Charismaqueen100@gmail.com?
Thank you,
Ava
October 9, 2011 at 1:40 am
casino bonusse
casino bonus
I have bookmarked your super page.
October 9, 2011 at 8:02 am
Assistance
It is a readable and useful post. It has been very helpful in understanding of various things. I’m sure a lot of people will share this point of view.
October 10, 2011 at 9:40 am
Bea Dettmering
Excellent article and easy to understand explanation. How do I go about getting permission to post part of the article in my upcoming news letter? Giving proper credit to you the author and link to the site would not be a problem.
October 11, 2011 at 9:06 am
Movie News, Movies Trailers Official (HD
Thanks for every other excellent post. The place else may just anybody get that type of information in such an ideal method of writing? I have a presentation next week, and I am on the look for such info.
October 11, 2011 at 12:33 pm
Grover Befus
Oh my goodness! an amazing article dude. Thank you Nevertheless I’m experiencing difficulty with ur rss . Don?t know why Unable to subscribe to it. Is there anybody getting identical rss problem? Anybody who is aware of kindly respond. Thnkx
October 11, 2011 at 2:36 pm
Waylon Pandya
An interesting discussion is worth comment. I believe that it’s best to write more on this matter, it might not be a taboo subject however usually people are not sufficient to speak on such topics. To the next. Cheers
October 11, 2011 at 5:55 pm
quality hotels
Hello! I have read some of your post here and found it interesting and it makes a lot of sense. Plus i love your theme here. Thumbs up! Keep on sharing!
October 12, 2011 at 5:08 pm
Lorene Leonpacher
An interesting discussion is worth comment. I think that it is best to write extra on this topic, it won’t be a taboo topic however generally persons are not sufficient to talk on such topics. To the next. Cheers
October 13, 2011 at 5:03 am
Graig Casimir
I like the valuable information you provide in your articles. I will bookmark your weblog and check again here regularly. I’m quite sure I’ll learn many new stuff right here! Best of luck for the next!
October 13, 2011 at 5:51 am
iphone app reviews
I am certainly bookmarking this internet site and sharing it with my acquaintances. You will be finding a lot of visitors to your internet site from me!
October 14, 2011 at 9:09 am
stop snacking
Can I just say what a relief to seek out someone who actually knows what theyre speaking about on the internet. You positively know tips on how to convey a problem to mild and make it important. Extra individuals must learn this and understand this side of the story. I cant consider youre no more well-liked since you definitely have the gift.
October 14, 2011 at 8:30 pm
Inivindrend
Hi folks, I just read in bebo >>ITNS<< could easily see $2 PPS? Is this a likelihood? http://bit.ly/na1Tkm
October 15, 2011 at 2:35 pm
ipad app reviews
This may possibly be the right weblog for every person who is wishes to learn about this subject. You already know significantly its practically challenging to argue to you (not too I personally would want…HaHa). You definitely put a entire new spin more than a topic thats been revealed for several years. Fantastic stuff, just wonderful!
October 16, 2011 at 3:47 am
mikeherbalifeh69
Regards for all your efforts that you have put in this. Very interesting information. “It is in our lives and not our words that our religion must be read.” by Thomas Jefferson.
October 16, 2011 at 2:50 pm
Watch Prison Break
Awesome topic, wish I could come up with stuff like that for my webpage, lmfao.
October 16, 2011 at 9:35 pm
How to Become a Video Game Tester
We loved your website so much we added it to http://www.usbhubreview.net/sites-we-like-2. Just fill in the offer and your backlink is permanent.
October 18, 2011 at 7:11 am
cheap uggs for sale
Today, with the fast lifestyle that everyone leads, credit cards have a big demand throughout the economy. Persons from every area of life are using the credit card and people who are not using the credit card have made arrangements to apply for one. Thanks for expressing your ideas about credit cards.
October 19, 2011 at 8:52 am
subliminal messaging
Would you be fascinated with exchanging hyperlinks?
October 20, 2011 at 3:37 am
Leland Reopell
The way you write make it really easy to read. And the design you use, wow. Thats a really good combination. And I am wondering what is the name of the theme you use?
October 20, 2011 at 12:15 pm
Edith Philp
I have been checking out many of your articles and it’s pretty clever stuff. I will surely bookmark your website.
October 24, 2011 at 7:07 am
Melina Irawan
Real wonderful information can be found on site . “Society produces rogues, and education makes one rogue more clever than another.” by Oscar Fingall O’Flahertie Wills Wilde.
October 25, 2011 at 7:43 am
Damon Benkosky
Thanks so much for this! I have not been this moved by a post for quite some time! You have got it, whatever that means in blogging. Well, Youre certainly someone that has something to say that people need to hear. Keep up the good job. Keep on inspiring the people!
October 25, 2011 at 10:24 am
how to be healthy
I am only writing to make you understand of the helpful encounter my friend’s daughter had reading through your web site. She came to understand lots of issues, most notably what it’s like to have an amazing helping heart to make the mediocre ones just know precisely some complex subject matter. You undoubtedly exceeded our desires. Thanks for providing those beneficial, safe, educational and unique guidance on your topic.
January 20, 2012 at 6:33 am
market plans for small business
Its such as you read my thoughts! You appear to know so much about this, like you wrote the ebook in it or something. I think that you just can do with a few percent to force the message home a little bit, but other than that, this is excellent blog. An excellent read. I’ll certainly be back.
March 12, 2012 at 6:22 am
Marine Aquarium Forums
Really nice read. I am going to link to this article from my site so you can get a few more hits, and educate my members.
Thanks again 🙂
February 6, 2013 at 11:12 am
http://tinyurl.com/creasims15484
Where exactly did you actually end up getting the recommendations
to publish ““How to set up a Reef Aquarium”? Thanks for your effort ,Kirsten
April 17, 2013 at 12:05 am
how to reupholster a chair
You’ve mastered the art of chair restoration. Another key challenge lies in determining whether the second hand mobile being purchased for resale is in good working condition, and the extent of repairs required, if any. STEP 5 – Paint the chair with the color of your choice.
May 11, 2013 at 2:43 pm
Utgard-Loki
Thanks so much for this. I’m a writer from Eddington, United States and what you’ve said here on wordpress.
com couldn’t be said any better. Going through this post reminds me of my previous roommate, Jon. He always kept preaching about this. I will definitely send this material to him. Pretty sure he will have a very good read. I appreciate you for revealing this.
September 28, 2013 at 8:24 pm
letitiabboothe.blinkweb.com
I used tto be able to find good info from your blog posts.
April 27, 2014 at 7:53 am
AFum
привет, мне придумалось поделиться

это нечто, что живет у меня дома:
Марусик 1.1 года
как вам?милый котик, дЫА?
покажите своих питомцев!
August 15, 2014 at 5:53 pm
treatments for hpv
I have a blog made with Blogger and it has Blogger logos at the top.. I’ve seen Blogger blogs without them, and it makes them a lot cooler..
September 9, 2014 at 11:51 am
PatrickDype
Компания Mig оказывает услуги по микрокредитованию граждан с плохой историей
http://vk.com/kredit_s_plohoj_kreditnoj
October 12, 2014 at 9:50 am
TravisZoot
Начинать подобно оно
где найти http://pretty-woman.name/kak-samostoyatel-no-prigotovit-skrab-dlya-tela/ Как самостоятельно приготовить скраб для тела? для этой странице находил но безвыездно ерунда
Накануне
June 16, 2015 at 2:19 pm
Olivernar
Агентство недвижимости “НОВОСЕЛЬЕ”® в г. Санкт-Петербурге оказывает все услуги на рынке недвижимости- полное сопровождение сделки, сделки по покупке недвижимости и тд. Мы так же поможем купить квартиру московская славянка.
http://images.vfl.ru/ii/1434461606/382d9e0c/9046916_m.jpg
June 21, 2015 at 9:33 am
ArthurPi
Хотите играть в пейнтбол? +7 (915) 366-5-777
http://grad-club.ru/ – лазертаг… 5 основных причин, почему играть в пейнтбольном клубе «Осадок» одно утешение:
Выгодные цены. Час зрелище в лазертаг – 500 рублей, в пейтнбол – 600 рублей, в стоимость включена вся необходимая экипировка, инструктаж, ведение зрелище профессиональными инструкторами и фотосъемка.
Удобное расположение. Клуб находится в черте города, недалеко через метро «ВДНХ». Ради личного автотранспорта есть отдельная большая парковка, а также въезд на территорию.
Инструкторы с большим опытом работы. Мы предложим вам массу вариантов зрелище, дадим полезные советы сообразно тактике и будем поддерживать вас для протяжении только пребывания у нас.
Безопасность. Площадки оборудованы так, для вы не получили никаких травм. Предоставляем только новость оборудование, выдаем защиту и следим изза вашей безопасностью во век игры.
Уютная зона отдыха. Вы можете не как активно обманывать сезон, но и успокаиваться с друзьями для свежем воздухе.
Подарки именинникам в Число рождения!
Почтение, спец суждение: 3 часа игры в лазертаг для одного человека – 1300руб.
August 22, 2015 at 2:12 pm
CharlesKes
Унивесальные электропроводные смазки ООО "Берс"
http://supercontact.ru/ – Унивесальные электропроводные смазки ООО "Берс">>>
October 5, 2015 at 2:12 pm
Josephmn
Компания недвижимости и строительства Новоселье, объявляет набор агентов по недвижимости, для работы на дому (квота). В офисе сидеть не нужно, работаете, исключительно на “свой карман”! Мы организовываем вам доступ к базам Квартирный вопрос, Аренда-Питер, N-Market и ЕМЛС, даем наши документы с логотипами и печатями агентства, вам будет дано право посещать офис для заключения договоров, помимо этого, проводить платежи через расчетный счет агентства (иногда за клиента платит его фирма). Если пожелаете, можете совмещать аренду и продажи.
Наши тарифы (указывается за месяц):
Комплект 300 руб:
– Доступ к базе Аренда-Питер;
– Доверенность;
– Агентское соглашение;
Пакет 500 руб:
– Доступ к базам Аренда-Питер и Квартирный Вопрос;
– Доверенность;
– Агентское соглашение;
– Два комплекта документов;
Комплект 1000 руб:
– Подключение к базам Аренда-Питер и Квартирный Вопрос;
– Доверенность;
– Агентское соглашение;
– Пять комплектов документов;
– Пять постановок в Квартирный Вопрос;
Сноска: 1 комплект документов – это два договора найма + соглашение об оказании услуг + соглашение о разделе комиссии.
Дополнительные опции к тарифам:
Дополнительная постановка в рекламу “Квартирный Вопрос”: +100 руб.
Дополнительный комплект документов: +100 руб.
База ЕМЛС: +1000 руб. мес.
База НМаркет: бесплатно!
Наш телефон: 8(953)155-88-90
АН “Новоселье” г. Санкт-Петербург
December 7, 2015 at 3:58 pm
Alfonzocof
Фирма Новоселье, приглашает риэлторов по вторичному жилью.Мы предоставляем вам доступ к базам N-Market , Единая МультиЛистинговая Система, и др. даем специализированное обучение в сфере недвижимости,уникальные методики,информационно-рекламное сопровождение,юридическую поддержку,стажировку под руководством опытного наставника,дружный коллектив,гибкий график,высокий доход, возможность посещать офис для заключения договоров.Если хотите, допускается совмещать аренду и продажи.
Ждем звонков: +7 (812) 6709677
http://images.vfl.ru/ii/1449497056/2c51cbba/10726682_m.jpg
December 8, 2015 at 11:27 am
Matthewsl
Ищите где срочно снять квартиру в СПб, а не знаете где искать? Значит, я солью в паблик полезный сайтик, где опубликована база для агентов в СПб. Вобщем, открываем сайт АрендаНева точка РУ и… что и требовалось доказать! 😉 Теперь у вас есть доступ к базе, где есть все квартиры и комнаты в СПб. Это самая настоящая, агентская база, в которой сами агенты и ищут квартиры и комнаты. Заходите и сами подбирайте себе жилье без комиссии.
March 24, 2016 at 1:06 pm
Lutherlime
Компания недвижимости и строительства Проспект, приглашает специалистов по аренде и продажи недвижимости, для работы вне офиса (квота). Свободный график посещения офиса, работаете, исключительно на “свой карман”! Мы организовываем вам доступ к базам Квартирный вопрос, Аренда-Питер, БАН СПб, N-Market и ЕМЛС, даем необходимые документы с логотипами и печатями агентства, возможность приходить в офис для заключения договоров, и принимать платежи по “безналу” (иногда за клиента платит его фирма). Если хотите, невозбраняется совмещать аренду и продажи.
Наши тарифы (указывается за месяц):
Пакет 300 руб:
– Подключение к базе Аренда-Питер;
– Доверенность;
– Агентское соглашение;
Пакет 500 руб:
– Доступ к базам БАН СПб, Аренда-Питер и Квартирный Вопрос;
– Доверенность;
– Агентское соглашение;
– Пять комплектов документов;
Комплект 1000 руб:
– Подключение к базам БАН СПБ, Аренда-Питер и Квартирный Вопрос;
– Доверенность;
– Агентское соглашение;
– Десять комплектов документов;
– Пять постановок в Квартирный Вопрос;
Важно: 1 комплект документов – содержит два договора найма + соглашение об оказании услуг + соглашение о разделе комиссии.
Дополнительные опции к тарифам:
Дополнительная публикация в рекламу “Квартирный Вопрос”: +100 руб.
Дополнительный комплект документов: +100 руб.
База ЕМЛС: +1000 руб. мес.
База НМаркет: бесплатно!
Ждем звонков: г. С-Петербург 8(951)661-51-20
January 30, 2017 at 12:55 am
JerryUseby
Предлагаю услуги слесаря-сантехника в СПб, исполняю работы по ремонту, демонтажу, монтажу, подключению, замене и настройке сантехнического оборудования (унитаз, ванна, смеситель, стиральная машина, гофра, сифон и многое другое). Работаю в пределах Санкт-Петербурга. Цены не завышаю, т.к. работаю самостоятельно (без посредников и бригад). Если заказ быстрый, и за час управлюсь – то беру 500 рублей… если объем работ достаточно велик, то договариваемся с заказчиком. Еще я, делаю разводку труб горячего и холодного водоснабжения по квартире (металлопластик или полипропилен, на выбор заказчика). Звоните, не стесняйтесь, стоимость моих услуг не велика! Тел: 89516732992
January 30, 2017 at 1:24 am
JerryUseby
Услуга слесарь-сантехник, русский, исполняю работы по замене, монтажу-демонтажу или ремонту сантехники (ванны, унитазы, сифоны, смесители и т.п.). Произвожу работы только в окрестностях Санкт-Петербурга. Ценник держу низкий, потому что, работаю один (без фирм и бригад). Если работы немного, и за час управлюсь – то тариф 500 рублей… если заказ объемный, то обсуждаем с заказчиком. Еще я, произвожу разводку труб горячего и холодного водоснабжения по квартире (металлопластик или полипропилен, на выбор заказчика). Звоните, не стесняйтесь, мои цены, вам понравятся! Тел: 89531558890
June 30, 2019 at 1:59 am
GilbertMes
buy cc – carder, carder forum
July 16, 2019 at 12:58 am
Stevepearp
best cvv seller – russian cvv shop, ccshop su online cvv shop